Deck Steps Ideas for Sloped Yards: Connecting Levels Safely in Buffalo
If your backyard drops two or three feet from the house to the lawn, the stairs are not an afterthought. They are the whole project. Most deck steps ideas you find online assume a flat lot and one short run of stairs off the edge. On a sloped Western New York yard, the steps are what connect your levels, carry people safely over a grade change, and decide whether the space actually gets used. This article covers eight ways to plan deck stairs for a multi-level or elevated deck, with the code rules Buffalo-area towns enforce and the framing details that keep steps solid through freeze-thaw winters.
One note before the list. The rise and run numbers below come from New York's residential code as adopted for 2026 projects. Your town's building department in Erie County has the final say, and permits for elevated decks almost always require a stair detail on the drawings. A deck builder who works sloped lots will handle that paperwork as part of deck design, not as a surprise later.
1. Start With the Code Numbers, Then Design Around Them
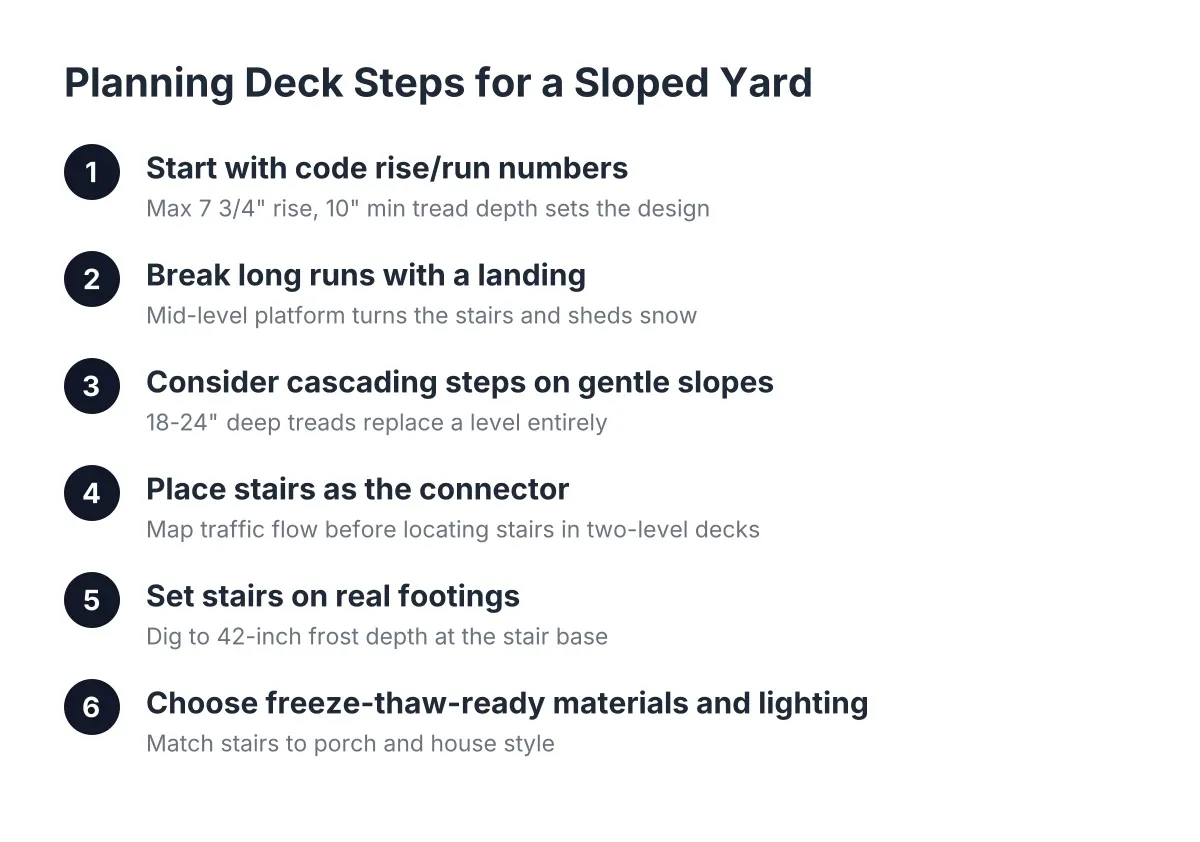
Deck stairs in New York follow a simple math problem: each step can rise no more than 7 3/4 inches, and each tread must be at least 10 inches deep. Those two numbers decide how many steps you need and how much yard the staircase eats. Everything else, the look, the lights, the landings, gets designed around that math.
For example, say a homeowner in Cheektowaga has a deck surface 44 inches above the low side of a sloped yard. At a comfortable 7-inch rise, that is seven steps, which means a stair run close to six feet before you add a landing. Knowing that early changes where the stairs go, and sometimes where the whole deck goes.
Railings follow their own rule. According to Mister Baluster, New York's residential building code requires a 36-inch guard height once a deck's walking surface is more than 30 inches above grade. On a sloped lot, one end of the same deck can be under 30 inches while the other end is well over. Measure at the worst point, not the easy one.
2. Deck Steps Ideas: Use a Landing to Break a Long Stair Run
A landing is the single most useful move for deck stairs on a sloped yard. Instead of one long, steep-feeling run from deck to grass, you build a platform partway down, turn the stairs, and finish the descent in a second short run. The stairs feel safer, the footprint fits a narrow yard, and you get a natural spot for a planter or a light post.
Deck stair ideas with a landing also solve a Buffalo-specific problem: snow. A straight 12-foot stair run facing the prevailing wind drifts shut in January. However, an L-shaped run with a mid-level landing tucks the lower flight behind the deck structure, where it stays clearer and sheds meltwater away from the footings.
Code treats a landing as a floor, so it needs its own frost-depth footings. In Western New York that means 42 inches down, same as the deck itself. That is extra digging, but it is what keeps the landing from heaving an inch every spring.
3. Let Cascading Steps Replace a Level Entirely
On a gentle slope, you sometimes do not need a second deck level at all. Wide cascading steps, each tread 18 to 24 inches deep instead of the 10-inch minimum, can step the deck down to grade over three or four tiers. They read as part of the deck, double as casual seating, and handle a short rise better than a formal staircase.
This is one of the better deck steps ideas on a budget, because each tier is simple box framing rather than stringer work. The trade-off is yard space; deep treads spread out fast. In addition, every tier still needs proper footings below frost depth, so cascading steps are not free, just simpler.
For a split level 2 level deck design, cascading steps work well as the transition between the upper dining level and a lower level near the pool or fire pit. Two or three broad steps feel like a feature, not a hazard.
4. Treat Stairs as the Connector in Two Level Decks
Two level decks with stairs live or die on where the stairs land. The common mistake is putting the connecting stairs wherever framing is easiest, which usually means the far corner. Then the grill is on the upper level, the table is on the lower level, and everyone carries plates around the long way all summer.
Instead, map the traffic first. Kitchen door to grill, grill to table, table to yard. Put the connecting stairs on that line. On a sloped lot this often means a short three or four step run between levels near the house, plus a longer run to grade at the low end.
A multi-level deck design that gets this right turns a yard people avoided into the room they use most. Suppose a new-construction home in Lancaster has a backyard that falls 40 inches from the patio door to the back fence. An upper level at door height, a lower level four steps down, and a final short run to the lawn gives three usable zones where a flat deck would have needed a tall, awkward staircase at one edge.
5. Build Stairs on Footings, Not on Hope
The weak point of most deck stairs in WNY is the bottom. Stringers resting on a paver or a floating pad will move when the ground freezes, and a staircase that heaves half an inch each winter works its fasteners loose in a few seasons. Lake-effect snow load adds weight the stairs have to carry too, since snow piles on treads the same way it piles on the deck.
Therefore, plan on real footings at the stair base, dug to the 42-inch frost depth Erie County inspectors expect. On a hillside, the stair footings often sit at a different elevation than the deck footings, which is normal; what matters is that each one reaches undisturbed soil below frost.
If you are researching how to build a deck frame yourself, the stair connection is where most DIY plans go thin. Stringers need a solid attachment at the top, proper bearing at the bottom, and hangers or blocking sized for the span. This is the one part of the project where a second opinion from a deck builder or your town inspector pays for itself.
6. Pick Stair Materials That Survive Freeze-Thaw
Stairs take more abuse than the deck surface. They get shoveled, salted, and walked on with wet boots from November through April. Composite deck boards on the treads hold up to that cycle better than painted wood, and they will not splinter or need restaining every other year.
However, composite stair treads need closer stringer spacing than wood, usually 12 inches on center or less, so the framing has to be planned for the material from the start. Swapping to composite after the stringers are cut at 16 inches leads to bouncy, unsafe treads.
A few material choices that earn their cost on Buffalo stairs:
- Composite or PVC treads with a textured surface for grip in snow and rain
- Pressure-treated stringers rated for ground contact at the base
- Hidden or stainless fasteners that will not streak rust down the risers
- Solid risers rather than open ones, which block wind-driven snow from packing under the treads
7. Light the Steps, Because Half the Season Is Dark
Buffalo loses daylight fast in fall, and a staircase you cannot see at 5 p.m. in November is a staircase people stop using. Low-voltage riser lights or post-cap lights on the stair railing cost little compared to the deck itself and get wired during construction, when the framing is open.
As a result, lighting belongs in the design conversation, not the finishing one. Riser lights need a channel for wire runs before the treads go down. Rail lighting needs the right posts in the right spots. Retrofitting any of it later means pulling boards.
On a multi-level layout, light every transition, not just the main run to grade. A single dark three-step transition between levels is the one people trip on, because nobody expects it.
8. Match the Stairs to the Porch and the House
Steps are the most visible vertical surface on the project, so they set the look. Porch steps ideas and deck stair ideas should pull from the same palette: riser color that matches the house trim, tread color that matches the decking, and railing style consistent from the custom porch out front to the pool deck out back if you are doing both.
For an above ground pool deck, the stairs also carry a safety job. Code and common sense both point toward a gated stair or a removable section so the pool is not open to small kids. Plan that gate into the railing layout from day one.
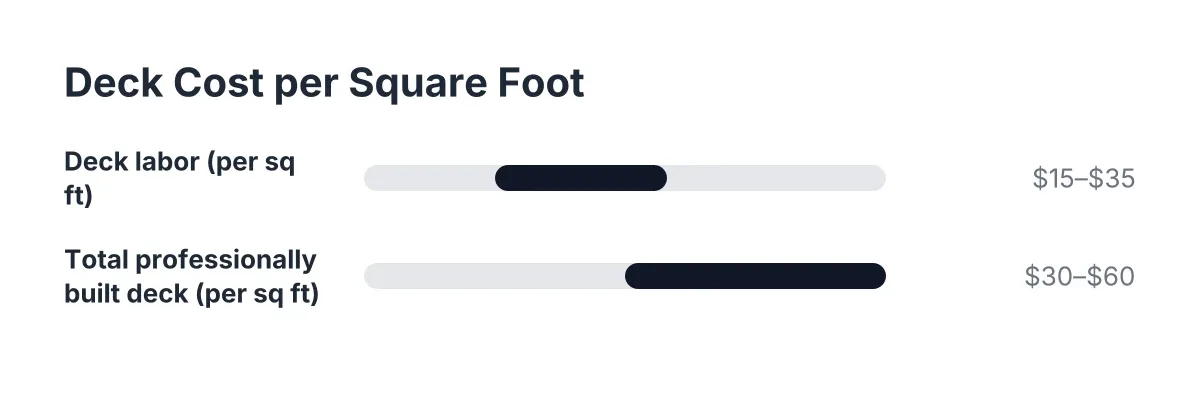
Cost-wise, stairs scale with height and complexity rather than with looks. According to Angi, as reported by NerdWallet, a professionally built deck averages $30 to $60 per square foot overall, and stairs with landings sit at the expensive end of that range because of the footings and framing labor involved. A straight run is cheaper than an L-shape with a landing; cascading tiers fall somewhere between. Honest numbers come from someone standing in your yard with a level, not from a flat-lot formula.
Deck Steps Ideas That Hold Up: A Short Planning Checklist
Before you sign off on a design for a sloped yard, walk through this list with your deck builder:
- Measure the full grade change from door threshold to the lowest point the stairs will land.
- Confirm every stair and landing footing goes to 42-inch frost depth.
- Check that any walking surface over 30 inches above grade shows a 36-inch railing on the drawings.
- Trace the traffic path between levels and make sure stairs sit on it.
- Ask how snow load and drainage were figured into the stringer and footing sizes.
- Verify the permit package includes a stair detail, since Erie County towns ask for one on elevated decks.
A sloped Buffalo backyard is not a problem to work around. It is the reason a multi-level deck with well-placed stairs ends up more useful than any flat rectangle could be. Get the rise-run math, the footings, and the landings right, and the steps become the part of the deck you stop thinking about, which is exactly the goal.
If you need deck building, WNY Deck Builders can help.
Prefer to talk it through? Call (716) 317-4901 — a quick call is usually the fastest way to get a straight answer for your situation.