Deck Framing Diagram Explained: Joist Spacing, Beam Sizing, and Load Requirements for WNY
A deck framing diagram shows everything you will never see once the deck boards go down: the footings, posts, beams, joists, and hardware that decide whether your deck stays level for 25 years or heaves out of square by year three. If you are planning a build in Buffalo or anywhere in Western New York, that hidden structure matters more here than in most of the country. Lake-effect snow load, 42-inch frost depth, and constant freeze-thaw cycles all push on the frame long after the crew leaves. This guide walks through how to read a framing plan, what joist spacing and beam sizing actually mean for your project, and how the numbers change when your yard slopes or your old deck is coming down for a rebuild.
Why the Structure Under Your Deck Matters More Than the Boards on Top
Most homeowners shop decks by what they can see. Composite versus wood, railing style, board color. That is fair, because the surface is what you live with every day. However, nearly every deck failure in Western New York starts below the surface, in the footings and framing.
Here is the short version of what goes wrong. Water gets into the soil under a shallow footing. Winter freezes that water, the soil expands, and the footing lifts. Spring thaws it, and the footing settles, but never back to exactly where it started. Repeat that cycle 40 or 50 times a winter for a few years and the deck racks out of level. Stairs pull away. Railings loosen. Ledger bolts strain.
A deck framing diagram is how a builder plans against all of that before a single hole gets dug. It maps footing locations against the loads above them, sets joist spacing to match the decking you chose, and sizes beams so the frame carries a Buffalo snow load without sagging. Reading one is not hard once you know what each line means, and it is worth learning whether you are hiring a deck builder or checking a permit set.
Reading the Deck Framing Diagram: A Top-Down View
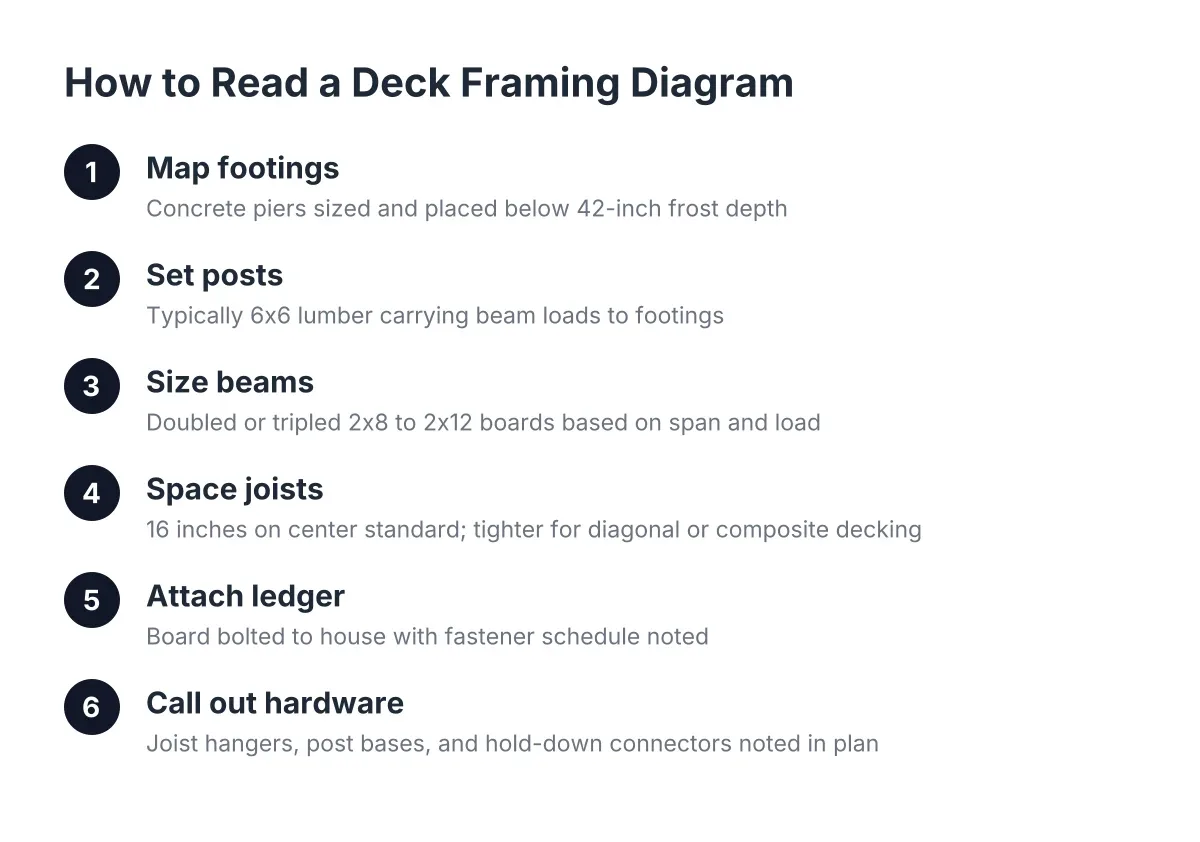
A deck framing diagram is a top-down drawing of the deck's skeleton, drawn as if the decking were removed. It shows the ledger board along the house, the beams running parallel to it, the joists spanning between them, and the posts and footings that carry everything to the ground. Dimensions on the plan tell you joist spacing, beam size, and how far each member spans.
Read it in layers, from the ground up:
- Footings. Circles or squares on the plan, usually with a diameter noted, such as 12 inches. Each one marks a concrete pier that must reach below frost depth.
- Posts. Squares inside or next to the footing marks, typically 6×6 lumber for anything elevated. These carry the beam loads straight down.
- Beams. Heavy double lines running parallel to the house. A note like "(2) 2×10" means two 2×10 boards fastened together as one beam.
- Joists. The repeated parallel lines spanning from the ledger to the beam. The spacing note, such as "16 inches on center," is one of the most important numbers on the page.
- Ledger. The board bolted to the house, drawn along the wall with its fastener schedule noted.
- Hardware. Joist hangers, post bases, and hold-down connectors, usually called out in notes rather than drawn in detail.
A good deck framing diagram with measurements also lists the lumber species and grade, because span limits change with the wood. If a plan you are handed has no dimensions, no footing sizes, and no hardware notes, that is a sketch, not a framing plan. Erie County towns will want the real thing with your permit application, and so should you.
Joist Spacing: The Number That Decides How Solid Your Deck Feels
Joist spacing is the distance from the center of one joist to the center of the next, and 16 inches on center is the standard for most residential decks. Tighter spacing, at 12 inches on center, is common when decking runs diagonally or when a composite product requires it. Wider spacing at 24 inches works only for thick wood decking on light-duty spans.
The spacing you need depends on what goes on top. Most composite deck boards are rated for 16-inch spacing when installed perpendicular to the joists. Run those same boards at a 45-degree angle for a pattern, and most manufacturers drop the requirement to 12 inches. Skip that adjustment and the boards flex underfoot within a season or two.
A deck joist spacing calculator can give you a starting point, and they are useful for rough planning. However, calculators do not know your snow load. Buffalo and the towns south of it carry ground snow loads well above the national default those tools assume. That extra load shortens allowable joist spans, which can mean adding a beam, upsizing joists from 2×8 to 2×10, or tightening spacing. This is where a local deck framing guide beats a generic one; the same 14-foot deck that pencils out fine in a milder climate may need a different frame here.
For a rebuild, joist spacing is also a diagnostic. If you pull boards off a failing 20-year-old deck and find joists at 24 inches on center under composite decking someone added later, you have found the reason the surface felt spongy. That frame was built for thick wood planks, not modern composite.
Beam Sizing and Post Layout: Carrying the Load to the Ground
Beams do the heavy work. Every joist delivers its load to a beam, and the beam delivers everything to the posts. Undersize a beam and the deck sags in the middle; the doors of the story are the footings and joists, but the beam is the hallway everything passes through.
Beam sizing comes down to three questions:
- How far does the beam span between posts? Longer spans need bigger beams. A doubled 2×8 might handle a 6-foot span between posts, while an 8-foot span pushes you toward a doubled or tripled 2×10 or 2×12, depending on the load.
- How much deck is the beam carrying? This is the tributary load, roughly half the joist span on each side of the beam. A beam in the middle of a large deck carries more than a beam at the edge.
- What is the design load? In WNY, snow load governs. A frame sized only for people and furniture is undersized for February.
Adding a post is often the cheapest structural fix on the plan. Shortening a beam span from 8 feet to 6 feet by adding one post and one footing can let you use smaller beam stock and stiffen the whole frame. On an elevated deck, where posts might run 8 or 10 feet tall, 6×6 posts with proper bracing are the baseline, not an upgrade.
Hardware ties it together. Every joist should sit in a joist hanger sized for it, every post should sit on a standoff base that keeps the wood out of standing water, and beam-to-post connections need real structural connectors, not toenailed spikes. Deck construction diagrams from the 1990s often show notched posts and nailed beams; 2026 code-compliant plans call for engineered connectors throughout, and inspectors in Erie County towns check for them.
Footings and Frost Depth: Why 42 Inches Is the Line in Buffalo
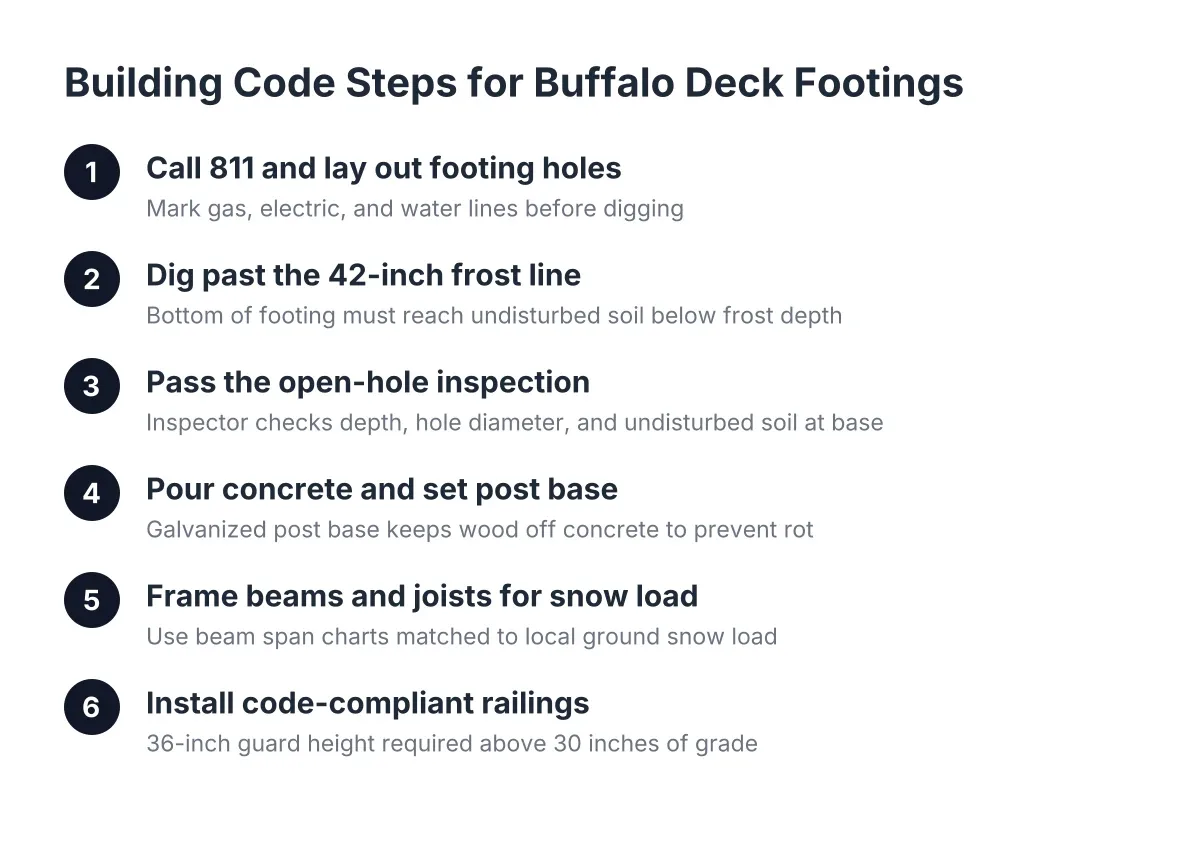
Deck footings in Buffalo need to reach at least 42 inches below grade, because that is the local frost depth. Concrete poured shallower than that sits in soil that freezes, expands, and lifts the footing each winter. A footing below the frost line rests on ground that never freezes, so it stays put.
This is the single most important detail in the entire structure, and it is invisible the day after the pour. Two decks can look identical from the yard. One has 42-inch piers on undisturbed soil; the other has 18-inch piers someone stopped digging when they hit clay. Five winters of freeze-thaw will tell them apart.
Precast concrete deck footings, the pyramid-shaped blocks that sit on grade, deserve a plain answer here. They can work for a freestanding ground-level platform in some situations. For an attached deck, an elevated deck, or anything carrying a snow load in WNY, they are the wrong tool, because they sit in the freeze zone by design and move with it. Most towns in Erie County will not approve them for an attached structure, and a plan that shows them is a plan to question.
Watch for footing failure signs on an existing deck:
- Stairs that no longer meet the landing squarely, or a bottom step that changed height
- Gaps opening between the deck and the house at the ledger
- Posts that lean or no longer sit centered on their piers
- Railings that got wobbly at one end of the deck but not the other
- Doors to the deck that stick in spring and swing free in summer
Any one of these on a 15-year-old deck is worth a structural deck inspection before you spend money on new boards. Resurfacing a frame with heaved footings buries the problem under nicer decking.
Framing a Sloped Yard: Deck Footings for Hillside Lots
Sloped yards change the framing plan more than they change the deck. The surface you walk on stays level; everything under it has to adapt. If your backyard drops 4 or 5 feet from the house to the property line, the framing diagram is where that problem gets solved.
The main adjustments are below the surface:
- Posts get longer as the grade drops. A deck that is 2 feet off the ground at the house might be 7 feet off the ground at the outer beam. Those tall posts need 6×6 stock and diagonal bracing to resist sway.
- Footings get dug to frost depth measured from the actual grade at each footing, not from the house. On a hillside, that means each pier depth is figured individually.
- Downhill footings often carry more load. Multi-level designs frequently concentrate weight on the lower level's posts, so those footings may need a wider diameter.
- Drainage matters more. Water running downhill toward your footings accelerates freeze-thaw movement. Grading and gravel around piers is cheap insurance.
Suppose a homeowner in West Seneca has a yard that drops about 5 feet over 20 feet behind the house. A flat 12×16 deck at door height would leave the far edge nearly 6 feet in the air with a long, awkward stair run to the grass. A multi-level plan instead steps down: an upper level at the door, a landing level 3 feet lower, and a lower patio deck near grade. In that scenario, the framing diagram shows three separate frames, shared posts where levels meet, and stairs between levels that each need graspable handrails and code-compliant rise.
One code number worth knowing for any elevated design: New York's residential code requires a 36-inch guard height once the walking surface is more than 30 inches above grade, according to Mister Baluster. On a sloped lot, part of your deck can be under 30 inches and part over it, so the railing requirement can change partway across the same deck. The framing plan should flag where guards are required, because guard posts need blocking and hardware in the frame, not just screws through the rim joist.
Multi-level framing does cost more than a flat rectangle of the same square footage. More footings, more posts, more stair framing, and more railing all add labor and material. The trade-off is that a well-planned multi-level deck turns a slope you cannot use into the most usable part of the yard, while a flat deck forced onto a hillside often just relocates the awkwardness.
Replacing an Old Deck: When the Frame Stays and When It Goes
If your existing deck is 15 or 20 years old, the frame decides whether you are looking at a resurface or a full rebuild. New composite decking on a rotten or heaved frame is money buried. New decking on a sound, code-compliant frame can be a legitimate budget saver.
A structural deck inspection before quoting should check, at minimum:
- Footing depth and movement. Are the piers at frost depth, and has anything shifted? Out-of-level checks across the frame reveal heave.
- Ledger attachment. Old decks were often nailed to the house instead of through-bolted with flashing. A nailed ledger is a rebuild item, full stop; ledger failure is how decks collapse.
- Joist condition and spacing. Probe for rot at the ends and tops of joists, and confirm the spacing supports the new decking you want.
- Beam and post condition. Posts buried in soil or set directly in concrete wick water and rot from the inside.
- Hardware. Rusted hangers and missing connectors are cheap to replace if the wood is sound.
Frequently, the honest answer on a WNY deck built before the mid-2000s is that the frame does not meet current deck footings and framing standards, even if the wood looks passable. Shallow footings, nailed ledgers, and 24-inch joist spacing were all common then. Since 2026 permit reviews in most Erie County towns check framing plans against current code, a replacement deck usually gets a new frame drawn from scratch rather than a patched old one.
Cost-wise, keep the framing conversation tied to factors rather than fixed numbers, because every yard differs. Height off grade, number of footings, soil conditions, slope, and snow-load requirements for your town all move the price. As a general market reference, professionally built decks average $30 to $60 per square foot according to NerdWallet, with the structural work below the boards representing a meaningful share of that. There is also a resale case for doing it right: homeowners recover 89% of the cost of a new wood deck at sale, per the National Association of Realtors' 2023 Remodeling Impact Report cited by NerdWallet.
Getting From Diagram to Permit to Build
The framing plan is not just a construction document; it is the core of your permit application. Buffalo and the surrounding towns each run their own building departments, but the pattern is consistent: you submit a site plan showing the deck's location and setbacks, plus framing plans showing footing depth and size, beam and joist sizing, ledger attachment, and railing details.
Therefore, insist on seeing the actual framing plan before work starts, whoever builds your deck. You are checking for a handful of things you now know how to read:
- Footings drawn at 42 inches or deeper, with diameters noted
- Joist spacing that matches your decking manufacturer's requirement for your board and layout
- Beam sizes with post spacing that keeps spans reasonable
- A bolted, flashed ledger detail, or a freestanding design where attachment is not practical
- Guard and stair details anywhere the surface is more than 30 inches above grade
One honest caveat: span tables and general guides cover standard situations, but they do not replace a professional review for unusual conditions. Tall elevated decks, decks carrying hot tubs, steep or unstable slopes, and poor soils can all require engineered solutions beyond standard framing plans. If your project has any of those, budget for that review; it is far cheaper than fixing a frame that was guessed at.
The structure under a deck is the part nobody photographs and everybody depends on. A clear framing plan, footings below the frost line, joists spaced for your decking, and beams sized for a Buffalo winter are what separate a deck that shrugs off freeze-thaw from one that starts moving in year three. Learn to read the plan, ask the specific questions, and the invisible work stops being a leap of faith.
If you need deck building, WNY Deck Builders can help.
Prefer to talk it through? Call (716) 317-4901 — a quick call is usually the fastest way to get a straight answer for your situation.